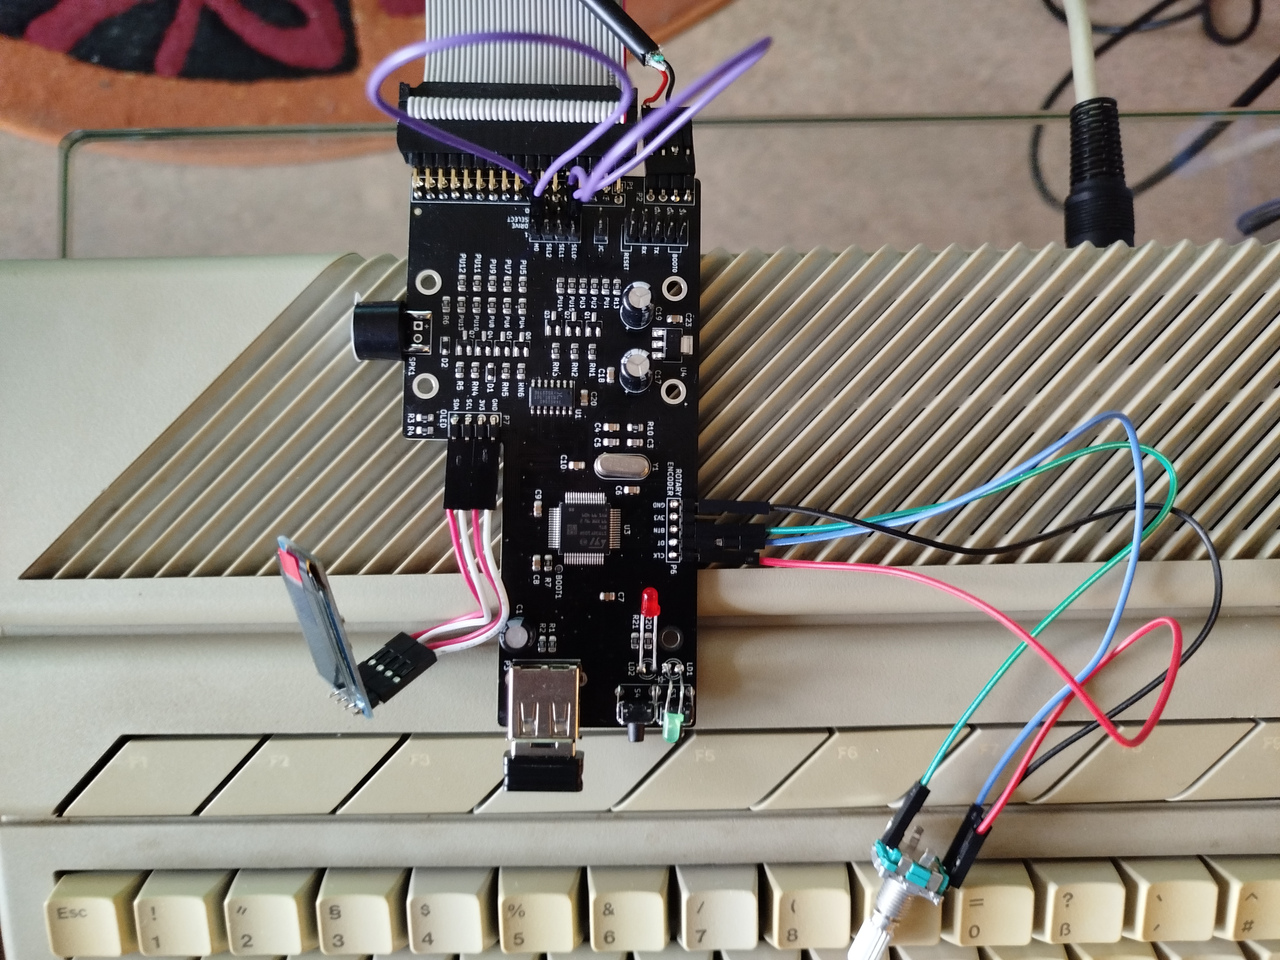
Rezept für Eintopf mit Grünen Bohnen

In Erinnerung an meine am 9.September verstorbene Mutter ein Rezept, welches mir immer sehr gut geschmeckt hat und ich auch selber ab und an gerne esse.
Vorallem in der dunklen Jahreszeit.

Rezept für Eintopf mit Grünen Bohnen

Für 2 – 4 Personen

  • Ein Glas oder eine große Dose Grüne Bohnen vorgegart
  • 3 mittlere Kartoffeln vorgekocht
  • 2 Mettenden (oder alternativ Wiener Würstchen)
  • 1 halbe gelbe Paprika
  • 1 mittlere Zwiebel
  • 300ml Gemüsebrühe
  • 1 EL Kräutersenf, alternativ mittelscharf
  • Bohnenkraut
  • grober Pfeffer
  • Salz
  • optional 1 halber kleiner Apfel
  1. vorgekochte Kartoffeln und Paprika in Würfel schneiden
  2. Bohnen ggfs. spülen und in einem Sieb abtropfen lassen
  3. Zwiebeln in kleine Stücke schneiden und in Butterschmalz im Topf anbraten
  4. falls Apfel vorhanden, kleine Würfel dazugeben und mitanbraten
  5. optional: ist die Kartoffel nicht vorgekocht, diese in kleinen Würfel mitanbraten
  6. Gemüsebrühe hinzufügen und auf hoher Stufe aufkochen bis es blubbert
  7. Kochplatte auf wenig bis mittlere Hitze reduzieren, grüne Bohnenhinzugeben
  8. Wurst in kleine Ringe schneiden und hinzufügen
  9. Bohnenkraut und Senf einrühren
  10. ca 10-15min bei geschlossenem Deckel köcheln bis alles gut durchgewärmt ist
  11. mit Salz und Pfeffer abschmecken

Guten Appetit!

RIP asmsoftware.de

Meine alte Domain war bislang werbefinanziert und da auch nur eine Weiterleitung. Der Provider will zukünftig  Geld dafür haben. Es war aber unklar, ob damit die Werbung verschwindet oder nicht. Ich hatte sie seit 2000 oder 2001 in Betrieb, seit meinem ersten Semester in Clausthal.

Da die zugehörige Emailadresse dazu auch schon lange verspammt war, habe ich jetzt entschieden, die Domain aufzugeben. Ich bin ja hier versorgt und brauche daher nicht doppelt zu zahlen.

Eine Übernahme der Domain habe ich erstmal ausgeschlossen. Wer weiß welcher Chinese sie kauft…

Daher RIP und auf Wiedersehen! Ich bin hier ja weiterhin gut erreichbar und ASM Software lebt weiter.

Warnung Windows 8 für Google Chrome deaktivieren

Um  unter Windows 8 die Warning von Google Chrome wegen ausbleibender Aktualisierung zu unterdrücken, benötigt man lediglich folgenden Key in der Registry.

Windows Registry Editor Version 5.00

[HKEY_LOCAL_MACHINE\SOFTWARE\Policies\Google\Chrome]
"SuppressUnsupportedOSWarning"=dword:00000001

Vorerst sollte das zum Surfen reichen, irgendwann gibt es hoffentlich HoloISO mit Support für NVDIA Grafik. Dann wird die Alienware uminstalliert.

Chrome OS Flex auf einem Medion Akoya P7641

Ich habe eben mal Chrome OS Flex auf einem Medion Akoya P7641 Notebook ausprobiert.

Prinzipiell läuft es vom USB Stick, eine Installation habe ich nicht probiert.

Surfen und Youtube funktioniert wie erwartet, die Webcam wurde mit Jitsi Meet auch erkannt.

Probleme hatte ich beim Powermanagement, nach dem Zuklappen konnte ich Chrome OS Flex hier nicht wieder zum Leben erwecken.

Aber prinzipiell ist Chrome OS Flex auch dem Medion Akoya P7641 lauffähig. Das gilt vermutlich auch für ähnliche Notebooks.

Problemlösung Screen tearing mit Steam Link unter Linux mit Intel Grafik

Ich hatte letztens mal den Steam Link Client unter Linux ausprobiert und hatte dabei dann Probleme mit Screentearing.

Ich verwende aktuell immer noch ein stabiles Xubuntu 18.04 und habe im Arbeitsrechner eine einfache Intel Onboard Grafik:

$ inxi -G
Graphics:  Card: Intel Atom/Celeron/Pentium Processor x5-E8000/J3xxx/N3xxx Integrated Graphics Controller
           Display Server: x11 (X.Org 1.19.6 ) driver: intel Resolution: 1920x1080@59.93hz
           OpenGL: renderer: Mesa DRI Intel HD Graphics 400 (BSW) version: 4.6 Mesa 20.0.8

Um das Tearing zu bekämpfen, habe ich die Konfigurationsdatei für X11 für die Intel Grafik genommen (geholfen haben dabei diverse Netzrecherchen) und dann angepasst.

/usr/share/X11/xorg.conf.d/20-intel.conf

Der Dateiname und -pfad wird für neuere Varianten von Ubuntu möglicherweise anders lauten.

In der Datei steht dann jetzt folgendes:

Section "Module"
    Load "dri3"
EndSection

Section "Device"
    Identifier  "Intel Graphics"
    Driver      "intel"
    Option      "DRI"   "3"    
    Option "AccelMethod" "sna"
    Option "TearFree" "true"
EndSection

Mit dieser Konfiguration ist das Screentearing verschwunden und auch Youtube ist deutlich glatter

Chrome OS Flex auf Fujitsu FUTRO S550-2 ThinClient

Ich habe heute mal Chrome OS Flex auf meinem Fujitsu FUTRO S550-2 ThinClient ausprobiert.

Fujitsu Futro S550-2

Probiert habe ich folgendes Image:
https://dl.google.com/dl/edgedl/chromeos/recovery/chromeos_14516.0.0_reven_recovery_dev-channel_mp-v2.bin.zip

Auf einen USB Stick habe ich es mit balenaEtcher geschrieben.

Der Thinclient bootet damit mit einem Google Splashscreen, aber dann wird der Bildschirm dunkel und das System reagiert nicht mehr.

Vermutlich sind 2GB RAM offiziell zu wenig, aber ich habe aktuell keine anderen RAM Riegel da, um sie im Thinclient auszuprobieren.

Experimente mit STM32 BluePill und libopencm3

Heute habe ich an einem Resturlaubstag mal ein bisschen mit meiner STM32 BluePill experimentiert.

Leider hat es einiges länger gedauert, als ich dachte.

Zunächst habe ich mir aktuelle Versionen von OpenOCD und den freien ST-Link Tools gebaut und installiert. Das funktionierte auch ohne Probleme.

Die ST-Link Tools bringen sogar eine GUI mit GTK3 mit. Leider kann das Tool nur Binärdateien auslesen und programmieren, aber es ist immerhin etwas bedienerfreundlicher als die Kommandozeilenvariante.

Danach habe ich mal die libopencm3 compiliert. Das ging auch gut, aber es gibt leider keine Installationsoption. Also muss man in die Projekte das jeweilige Verzeichnis entsprechend reinverdrahten.

Ich habe auch die offiziellen Beispiele mal übersetzt. Zumindest das Systicker Blink, USB HID und USB COM Port Beispiel für STM32L1 habe ich mit meiner BluePill zum Laufen bekommen.

Danach habe ich mir die Infrastruktur für eigene Projekte bauen wollen und bin beinahe gescheitert. Aus einigen Quellen musste ich mir Teile zusammenklauen, aber ich kann jetzt über CMake entsprechende Projekte aufsetzen, die die libopencm3 benutzen.

Das ganze habe ich im Visual Studio Code aufgesetzt und wollte dann die Debugerweiterung für Cortex-M benutzen und bin wieder gescheitert.

Nach langem Puzzeln habe ich gemerkt, daß mein gdb zu alt ist. Dann musste ich mir erstmal eine aktuelle Version bootstrappen.
Kurzentschlossen wollte ich die offizielle ARM Toolchain installieren, aber das waren 0,5GB Download. Das war mir doch zu riesig, also habe ich einen offiziellen gdb runtergeladen und mit einer kleinen Anleitung auch gebaut.

Mit dieser gdb Version konnte ich dann aber tatsächlich debuggen und mit .svd File auch die Peripherieregister anschauen.

Gelernte Punkte habe ich gleich mal in einer Wissenssammlung aufgeschrieben. Die werde ich vermutlich zukünftig noch erweitern und ggfs ergänzen.

Eigentlich wollte ich noch ein Beispiel mit Segger RTT ausprobieren, bin aber nicht mehr soweit gekommen.

Elite tips & tricks (Atari ST version)

Elite (Atari ST version)

Back in 2005 we had a massive thread regarding the game Elite on atari-forum.com and I translated a somewhat helpful document to English back then.

This now goes here so I don’t forget about it ;)

Elite tips & tricks (provided by keili, translation by ssb)

The goal of Elite is to reach the rank of ELITE as soon as possible.
To reach this goal there are 5 missions in the game that the player should accept and fulfill in order to become ELITE. It is evident that the player should be fully able to fly the Cobra MKIII in any situation. Make sure you have installed the following equipment before attempting the first mission:

  • military laser front and aft
  • ECM
  • docking computer
  • energy unit
  • fuel scoop (NOTE: Always useful to add cargo and fuel to your ship!)
  • intergalactic hyperdrive

1. Mission: Search’n’Destroy the Constrictor

This mission will lead you through several galaxies. While chasing the Constrictor craft, you’ll get a next destination communique at every station you dock. Visit these systems one after another. As soon as you have found the Constrictor, it will appear as a Thargoid ship on your radar. Take care as the Constrictor has awesome firepower – about the same as a Thargoid so beware. Destroy the Constrictor and dock to the next station to gain a reward of 10000 credits.

NOTE: I think I’ve read somewhere that one can collect equipment from the blasted Constrictor. However as far as I remember all I could get into my hold were computers I could sell.

2. Mission: Transport vital and secret Thargoid documents

The player needs fiercy tactics to hold out and survive. It is helpful to equip your ship with retro rockets.
As soon as you have the documents, only Thargoids will attack you from now on. NOTE: And up to 4 of them at a time!
The best tactic is to point your ship’s aft at the planet, use the retrorockets and fire at the Thargoid ships to keep them at bay. Use the docking computer as soon as possible (in FAST mode :) I add).
Transfer the documents. You will gain a Naval Energy Unit that will charge your energy as twice as fast as the normal unit.

3. Mission: Save a station crew from a supernova

You cannot get this mission at a station. The player has to look for it himself.
Look for your Elite Score. Around 270000 points, you should lookout for mission 3. Look on the local star chart for a star that is going to become a Supernova soon. Find and fly to it. The message “Fuel leak” will appear. Fly to the sun and scope up fuel.
Now fly to the station and pick up the people there. Launch and immediately jump to a target system. The sun will go supernova in 15 seconds so you have to be fast. At successful docking somewhere else you’ll get a reward of 1kg of gem stones. NOTE: Normally you buy those in gram quantities ;)

4. Mission: Search’n’Destroy the Cougar

When you enter a space station, you will be told that there is a special ship in orbit which can cloak itself and jam other ship’s systems. The player can decide if he wants to fulfil this mission. You are not forced to accept it. However it is impossible to reach ELITE without blasting the Cougar.
To find the Cougar, point your ship at the sun and use the short distance jump. You’ll detect 3 ships on your scanner then. The Cougar and with 98% probability two Asp MKII.
Blast the ASPs with an energy bomb and, important, use the retro rockets. Target the cougar and open fire. Use the retro rockets when the Cougar opens fire. Stop firing as soon as the Cougar explodes or you will destroy precious cargo containers. Use the fuel scoop to collect the containers and get the cloaking device. Use key ‘Z’ to activate the cloak. (NOTE: I don’t know for which keyboard layout that goes, I assume German one but would try out anyway.) It takes a lot of energy to cloak so choose wisely when to activate it.

5. Mission: Destroy a station invaded by Thargoids

Someday you’ll get a message that the Thargoids have started to invade the galaxy. Make sure your Cobra is fully equipped with the cloaking device, 4 rockets, military lasers, naval energy unit and enough fuel to run.
From now on, all orbital statations are occupied by Thargoids. Their appearance will alter as well. Fly to a planet with a high industrial rating (12 or so). On your way, Thargoids will attack you so it might be useful to reuse your tactics from the documents mission.
Use missiles to destroy the station when in range. Thargoid occupied stations have no ECM fitted. Make sure the station has been destroyed. You will gain an ECM jammer that will deactivate ECM systems on other ships. Press ‘L’ to actviate the jammer.
NOTE: I suppose one has to fill up at the sun in order to leave the system as you will destroy the only station.

Generic notes:
In a “Drive malfunction” situation, you are in deep trouble. Keep the Thargoids at bay while your systems will be repaired automatically. Select a new hyperspace destination and attempt to hyperspace after 5-10mins. Sooner or later the drive will work again.

Later in the game it is wise not to use the escape pod. You will use all your ELITE score to go for the next mission. The score will still display but you will have to collect as much points again. Next mission every 90000 points so if you have 80000 and use the escape pod, you’ll have to make 180000 for the mission. Destroy enemy ships to gain score.

Do not buy the cute Trumbles. They will breed and occupy your cargo hold. Fly to the sun to roast them in order to make a ball of furs out of them. That is a rumor and noone will guarantee it will work.

[…]

To the beginner, the following ships are dangerous and mostly deadly: (Target them and press ‘I’ to get a ship ID)
Asp MKII
Wolf MKII
Thargoid
They are deadly in 90% of all cases so save your game everytime you dock!

NOTE: I personally don’t think the Asp is that dangerous. Beware of Geckos, I think those are more deadly. You can kill an Asp with a missile which won’t work on Geckos.

If a Thargoid spreads small daugther ships, you will be able to scoop them up to get “Alien Items” in your cargo hold.

….

Some more personal tips by Simon Sunnyboy:

  • Do not attempt piracy in democracy or corporate state worlds. Choose Feudal or Anarchy.
  • Do not shoot space stations. You won’t be allowed to dock with the computer then and the police will come to shoot you.
  • If you pirated in a system (blasting yellow cargo ships), the police will probably appear near the station. You can only dock manually then if you manage to survive.
  • Buy a fuel scoop soon and collect cargo canisters when you blast an enemy. Get precious cargo for free. A simple Sidewinder worth 5 credits of bounty might turn into a 150 credits fortune if you sell its cargo of machinery or computers.
  • Avoid selling firearms, slaves and narcotics at friendly worlds. Feudal or Anarchy won’t care.
  •  Safest worlds are either democracy or corporate state. Less pirates will attack you on your way.
  • Always use the ID feature of your gun sight to check who is attacking you.
  • Blast Thargoids and Wolf MKII first if you detect any in a formation.
  • The cargo hold expansion is a must-have for any privateer scooping up cargo.
  • If you want to buy goods yourself, check your planned destination first to decide which goods to buy. Food won’t sell on an agricultural world ;)
  • Save early, save often!
  • The Atari ST version offers RAMSAVE which is rather quick. Use it if playing on a real machine, just don’t forget to save to disk before switching the machine off.

Have fun, Elite rulez hard!

Hatari unter Recalbox

Wenn man weiß wie, funktioniert auch die Atari ST Emulation mit Recalbox ganz anständig.

Ich habe z.B. Nebulus, Pacmania und Bubble Bobble aus der Menüreihe von Automation damit zum Laufen bekommen.

TOS ROM Images müssen im BIOS Ordner installiert werden. Der Emulator erkennt die Images über Checksummen, daher funktioniert es mit EmuTOS leider nicht.

Für den Start sollten ein TOS 1.02 oder 1.04 ausreichen. Vermutlich funktionieren UK Varianten am ehesten.

Die Bedienung ist etwas gruselig mit Controller, Spiele, die die Maus benutzen, sind praktisch unspielbar.

Alles was mit Joystick und vielleicht einer Taste auskommt, sollte aber laufen.

Folgende Hilfen beziehen sich auf einen XBOX 360 Controller.

  • Start aktiviert das von Hatari bekannte Konfigurationsmenü. Der Mauscursor ist dann mit dem Pad steuerbar.
  • Select am Controller schaltet das Gamepad zwischen Joystick und Mausmodus um.
  • Mit L1 kann man einblenden, was gerade aktiv ist.
  • Mit Y wird eine virtuelle Tastatur ein- und ausgeblendet. Das reicht um kurze Menüauswahlen zu treffen oder Trainermodi zu konfigurieren.

Funktionsfähig sind .ST und .MSA Images. Manche .STX Images funktionieren, aber nicht alle.