Der kurze Weg zur RS232

Da mein neuer ACER AS X1301-3 von Haus erstmal keine RS232 Schnittstelle mitbrachte, hatte ich schon beim Kauf darüber nachgedacht. Schließlich brauche ich einen solchen Port für meine Mikrocontrollerprojekte und -basteleien.

Da der Rechner laut Datenblatt über einen PCI Express x1 Slot verfügte, kaufte ich gleich eine passende Steckkarte mit. Heute morgen habe ich mich dann daran gemacht , die Karte einzubauen. Das Garantiesiegel am Rechner habe ich geflissentlich ignoriert und die Seitenverdeckung abgeschraubt.

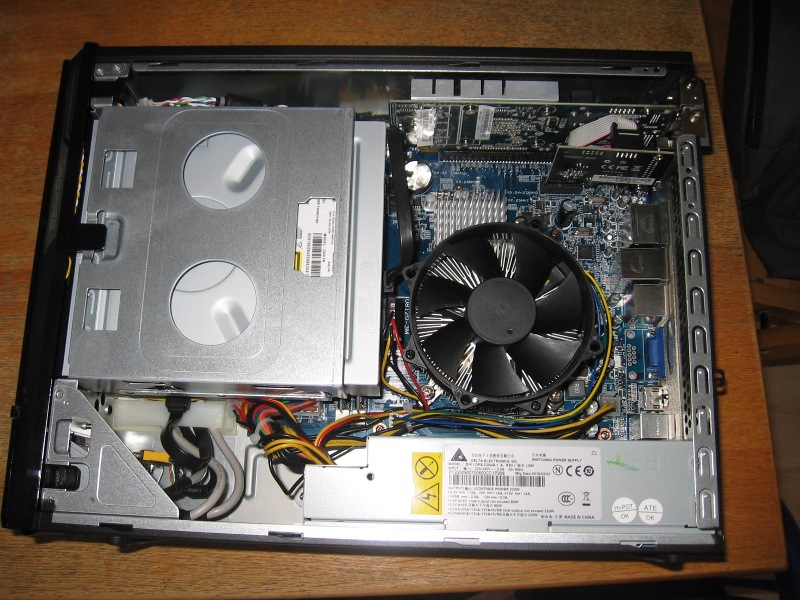
ACER AS X1301-3 von innen (PCIe Slots oben rechts)

Wie man schön sieht, ist die Grafikkarte doch nicht Onboard, sondern belegt einen PCI Express x16 Slot ganz oben. Immerhin, das erlaubt später mal einen Austausch. In den x1 Slot darunter setzte ich also die RS232 Karte von Delock. Genau eine Delock 89236 mit 16C950 Uart.

Delock 89236 RS232 für PCI Express x1

Windows  7 erkannte die Karte erstmal nicht, mochte sie aber nach dem ich von der Treiber-CD einen passenden Treiber eingespielt hatte. Mit Teraterm konnte ich dann auf mein Phytec Mikrocontrollerboard über die frische RS232 zugreifen. Warum Windows die Schnittstelle allerdings als COM3 einbindet, wenn es sonst keine RS232 im System gibt, erscheint mir aber fragwürdig.

Unter Linux war es zunächst etwas wackelig. Beim ersten Booten zeigte der Kernel die Schnittstelle zwar korrekt über dmesg an, aber beim Zugriffsversuch bekam ich einen I/O Error.

[    0.650679] Serial: 8250/16550 driver,
 4 ports, IRQ sharing enabled
[    0.650942] serial 0000:03:00.0:
 PCI INT A -> Link[AE2A] -> GSI 16 (level, low) -> IRQ 16
[    0.650950] 1 ports detected on
 Oxford PCI Express device
[    0.651010] ttyS0: detected caps 00000700
 should be 00000100
[    0.651014] 0000:03:00.0: ttyS0 at MMIO 0xfd9fd000
(irq = 16) is a 16C950/954

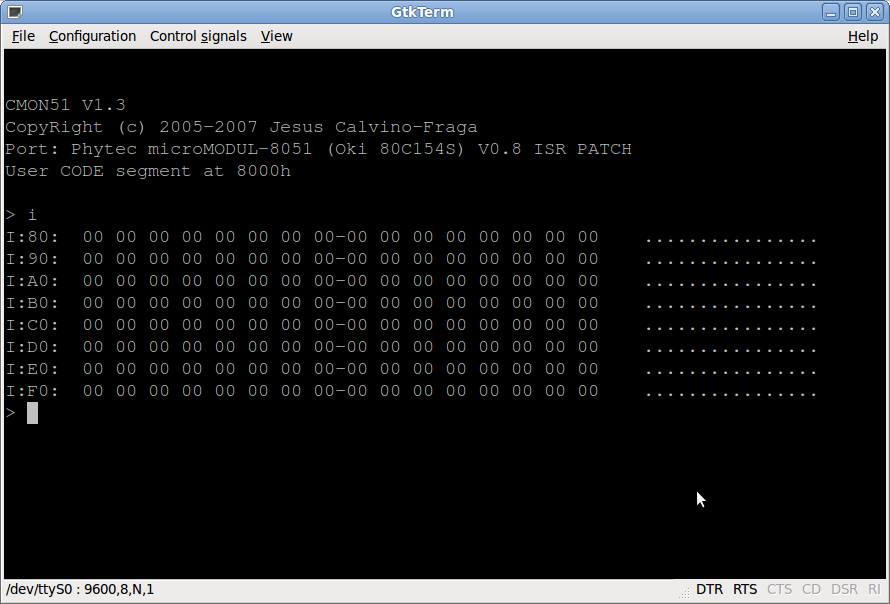
Nach einem Reboot funktionierte es allerdings und ich konnte das Board wie unter Windows mit gtkterm ansprechen:

GTKTerm
GTKTerm

Ob die Schnittstellenkarte auch mit meinem AVR-Board harmoniert, muss ich noch herausfinden. Da allerdings Linuxseitig der reguläre Treiber für RS232 Schnittstellen verwendet wird, bin ich eigentlich recht zuversichtlich.

Insgesamt müsste die Delock 89236 Karte damit Linux tauglich sein!

emu51 under GNU/Linux

ASM Software was able to build and run the 8051 emulator emu51 (http://emu51.sourceforge.net/) under GNU/Linux.

Download the source distribution, make sure you have the Allegro library installed, and now compile emu51 with this Makefile.

The emulator seems to work but keep in mind it is very early alpha and the interface not that easy.

If you use SDCC, make sure to issue the packihx command first. emu51 has problems with reading the .ihx output of SDCC properly.

Once a port to the SDL library was planned but the project was abandoned due to lack of time.

SDCC tutorial

This is a small tutorial how to invoke and use the Small Devices C Compiler (SDCC).
SDCC can be found at http://sdcc.sourceforge.net/. It is a cross compiler for ANSI C with various MCU targets including MCS51, PIC14 and Z80.
All testing has been done under GNU/Linux and the instructions to build and operate SDCC under other operating systems may vary considerably.

Building the compiler

The compiler comes as a standard GNU package as sourcecode licensed under the GNU General Public License. Just go to http://sdcc.sourceforge.net/ and grab a current source distribution. Now follow these simple steps to build, test and install the compiler:

  • change to a directory of your choice to build the compiler ~/src/ might be an optimal choice
  • $ tar xvzf path/to/sdcc/source/sdcc*.tar.gz
  • $ cd sdcc
  • $ ./configure
  • $ make             # this will take some time!
  • $ su -c “make install”
  • now typein your root passwort to install the SDCC system into /usr/local

To build SDCC, you will need GNU Make, GCC, Flex and somemore tools. A standard GNU development and compiling environment should suffice.

First test

The first compiler test is simple: just type at your shell prompt:

  • $ sdcc -v

If you see the following output in your terminal, all went well and SDCC was properly installed on your system.

SDCC : mcs51/gbz80/z80/avr/ds390/pic16/pic14/TININative/xa51/ds400/hc08 2.4.8 #977 (Mar 202005) (UNIX)

Now SDCC is installed and should be ready to build programs for any supported MCU.

Your first program

As I have a mcu board with a MCS51 compatible controller, we’ll assume from now on that you will want to develop your C program for a MCS51 target.
Write your C program with your favourite editor, make sure to include 8051.h to gain access to all 8051 SFRs.

#include <8051.h>

Write a simple program like the following:

#include <8051.h>
void main(void)
{
int i=1;
P1=0;  /* clear PORT1  of the MCS51 – P1.7 used as LED output */
for(;;)
{
P1_7=!(P1_7);   /* toggle P1.7*/

for(i=1;i<15000;i++);
/* idle loop – eat CPU time */

}
}
Now save it as porttest.c.

Now build your C program by typing:

  • $ sdcc porttest.c

SDCC will output an awful lot of temporary and listing files while compiling the program. If all goes well, you will get an Intel HEX file called porttest.ihx.

It is a good idea to use the packihx command on the resulting .ihx as the output of SDCC is not compatible with all loaders. It works with IO redirection:

  • $ packihx <input.ihx >output.hex

By default SDCC will relocate your program to address 0x0 including a proper interrupt vector table in case you have defined interrupts from C. That is possible, just refer to the SDCC documentation. Now put the HEX file into your code memory and run it.

Relocating your program to a different location

Sometimes you will not want to relocate your program to run from 0x0. Perhaps you have a board with RAM mapped as code memory and it does not start at 0x0. Using assembly language you would simply put an ORG 0x4000 or similar into your source. SDCC has to be instructed with a compile time parameter to achieve the same effect.
Try:

  • $ sdcc –code-loc 0x4000 porttest.c

SDCC will now compile and build your program as usual but it will now have its reset vector and interrupt vector table relocated to 0x4000 and up. This means to run your program now, you have to run your code with a jump or similar from 0x4000.
Important: SDCC will still generate the interrupt vector table but it will not be initialized at the proper location. Your startup code or some sort of utility has to copy the contents of the C code interrupt vectors into the MCS51 interrupt table by hand to activate it.

Alternate output file format

SDCC cannot only output your program as a Intel HEX file but also in Motorola S-Record format. Just use a commandline like this:

  • $ sdcc –out-fmt-s19 –code-loc 0x4000 porttest.c

In case you need different output formats you can use the SRecord software package to convert from Intel Hex or Motorola S-Record to many lesser known file formats.

Using the C library

SDCC comes with a implementation of the standard C library known as libc under GNU/Linux. You can use it as normal but note that you’ll have to implement your own functions for putchar() and getchar(). All other terminal I/O functions use these and you have to link your program with a serial I/O driver and put proper putchar() and getchar() functions in. Interestingly putchar() and getchar() are no macros but real functions in SDCC contrary to the ANSI C standard.

Last words

For more detailed documentation, especially on usable memory models, inline assembler and interrupt handling, refer to the excellent SDCC documentation which should be included in your SDCC source package.
This concludes our little SDCC tutorial and we hope you will be able to get started with software development in C for your MCU with the SDCC system.
small SDCC projects and sources

This page contains some simple projects and programs for use with the SDCC compiler and a 8051 compatible mcu.

register definition for Atmel T89C51CC02
This register definition include file is for use with the SDCC compiler. It is based upon the faulty one supplied by Atmel.
Download (7k)

A/D convertor access for Atmel T89C51CC02
This sample C file for the SDCC compiler supplies a simple routine to measure voltages with the builtin analog-digital convertor of the Atmel T89C51CC02.
The routine works with simple polling.
Download (0.7k)

register definition for Oki MSM80C154S and MSM83C154S
This is a register definition include file for use with the SDCC compiler. It mainly defines the IOCON register and its different bits.
(NOTE: This register definition comes included with SDCC since version 2.6)
Download (1.8k)

SIO Test
A simple test program to initialize and use the SIO of a 8051 mcu from the SDCC compiler using autobaud detection and polling variants of putchar() and getchar().
Download (3.6k)

Delay
A simple routine which uses inline assembly to give a delay routine. It waits for 100ms on a MCU clocked at 12MHz with default of 12 cycles per instruction.
Download (0.5k)

MicroSIO
A small lib for use with SDCC and a 8051 target for using the SIO in polled mode without disabling a running SIO IRQ. It is intended for use with the Tasking Monitor and a preconfigured SIO. The routines  have been tested with my development board. A Makefile for multiple file SDCC project include.
Download (1.5k)

ASM Software Monitor-52

amon52 – “a monitor for 8052/compatible mcu”

ASM Software Monitor-52 is a monitor/debugger for 8052 compatible mcus with the possibility to have code memory mapped into external RAM like my development board by Phytec does.

THIS IS A EDUCATIONAL PROJECT WITH THE PURPOSE ON LEARNING HOW IT HAS TO BE DONE. IT IS NOT MEANT TO BE USED COMMERCIALLY OR TO BE SOLD.

amon52 features:

  • almost no IRAM usage: uses register bank 2 for internal data and bank 3 for work
  • user program have register banks 0 (default) and 1 at their disposal
  • monitoring of registers for user program
  • IRAM read/write/dump
  • XRAM read/write/dump
  • SFR monitoring
  • code memory viewer
  • loading Intel HEX files into XRAM
  • jumping and calling user code
  • interrupt vector copy to XRAM (including forwarding into a user program)
  • welldefined and known jump table for access of monitor routines by user programs
  • SIO running on Timer 2
  • only valid input is echoed – you can’t type wrong chars!
  • Interface protocol is designed in a way that an external program on your PC can interface with amon52. This should allow to run a nice GUI debugger in the future.
  • more things to come in the future

The current state of the project is not completely functional, buggy, tailored to be run from inside the Tasking monitor and comes without documentation or warranty.

ALPHA SOFTWARE – DO NOT USE IN PRODUCTION SYSTEMS UNTIL FURTHER NOTICE!

This monitor source is specially configured to work with the PHYtec microMODUL-8051. It should work on any board with few changes necessary. (Mainly comment the Phytec memory init routine out.)

Screenshots

screen shot of v0.2 running on my board

Download
Version v0.2 (May 15th 2006) (13.5k)
Version v0.4 (May 17th 2006) (53k)

Release Notes
v0.2 – initital open release, contains bugs and not all functionalities
v0.4 – release with all major features implemented, probably NOT bugfree

Compiling

To compile amon52, you will need Asem-51, SDCC and GNU Make.

Tools and files for 8051 compatible microcontrollers

Here you can find some tools, configuration files and generic information regarding MCS51 compatible mcus.

as31 assembler for Intel 8051 derivates

This is a patched version of the famous as31 assembler. It is now compatible with our development board. And can therefor be used with other Phytec 8051 boards and units as well. The original of the assembler can be found at Paul’s 8051 tools.
Download (83.5 K)

Intel 8051 assembler syntax highlighting definition for the editor Kate

A simple syntax highlighting definition for the text editor Kate for highlighting as31 source files.
Assigns itself for .a51 extension.
Download .xml file (5.7 K)